Keeping Your Home Running Smoothly with Appliance Repair

appliance repair

Household appliances play an essential role in daily life, making tasks faster, easier, and more efficient. From refrigerators that keep food fresh to washing machines that save time on laundry, these appliances are central to modern living. But when they break down, it can disrupt your routine and create unnecessary stress. This is where appliance repair becomes vital. Instead of rushing to replace costly equipment, professional repair services can restore function, extend the life of your appliances, and save money in the long run.

Why Appliance Repair is Important

Appliances are designed to make life convenient, but like any other machinery, they are subject to wear and tear. Motors burn out, seals wear down, and components may stop working after years of use. Ignoring small issues often leads to larger problems and higher expenses. Repairing appliances promptly ensures they operate safely, efficiently, and reliably.

Timely repairs also help conserve energy. A malfunctioning refrigerator or dryer, for example, may consume more electricity than necessary. By addressing issues quickly, you not only restore performance but also lower utility bills.

Common Appliances That Need Repair

Almost every home relies on a variety of appliances, each of which can require attention at some point.

  1. Refrigerators and Freezers
  2. These are among the most critical appliances in a household. Common issues include temperature fluctuations, faulty thermostats, or broken seals that prevent proper cooling. Repairing these issues quickly prevents food spoilage and waste.
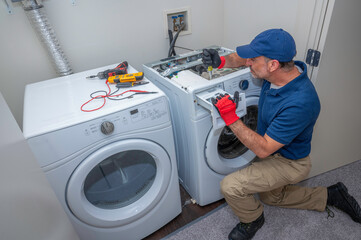
  3. Washing Machines and Dryers
  4. Laundry appliances handle frequent use, leading to problems like leaks, drum malfunctions, or heating element failures. Professional repair ensures clothes are cleaned and dried efficiently without further damage.
  5. Ovens, Stoves, and Microwaves
  6. Cooking appliances are central to meal preparation. Burners that fail to heat, malfunctioning controls, or uneven cooking can disrupt routines. Appliance repair restores safety and functionality in the kitchen.
  7. Dishwashers
  8. Leaks, clogged drains, or faulty spray arms are common problems that reduce cleaning performance. Repair services extend the life of dishwashers while ensuring hygienic, spotless dishes.
  9. Small Appliances
  10. Even smaller units like coffee makers, blenders, and toasters may require occasional servicing. Though they may seem inexpensive to replace, repairs can often restore them to like-new condition.

Benefits of Professional Appliance Repair

Choosing professional appliance repair over DIY fixes or replacements comes with many advantages.

  • Cost Savings: Repairing an appliance is typically far less expensive than purchasing a new one.
  • Extended Lifespan: Routine maintenance and timely fixes can add years to the life of household machines.
  • Safety: Professionals have the training to handle electrical and mechanical components safely, reducing risks of accidents.
  • Convenience: Repair services save time and restore daily routines quickly.
  • Environmental Responsibility: Repairing rather than replacing reduces electronic waste, making it a sustainable choice.

Signs That Your Appliance Needs Repair

Recognizing when an appliance is in trouble helps avoid sudden breakdowns. Common warning signs include:

  • Strange noises or vibrations during operation.
  • Higher than usual energy bills without increased usage.
  • Leaks or visible wear and tear.
  • Inconsistent performance or failure to complete cycles.
  • Unresponsive controls or error messages.

Catching these signs early allows for simpler, more affordable repairs before problems escalate.

Preventive Maintenance for Appliances

While repairs are essential, prevention is just as important. Regular maintenance keeps appliances in top condition and reduces the chances of unexpected issues.

  • Refrigerators: Clean condenser coils and check seals for leaks.
  • Washing Machines: Inspect hoses for cracks and avoid overloading.
  • Dryers: Clean lint traps and ducts to improve airflow.
  • Ovens and Stoves: Check burners and keep surfaces free from spills.
  • Dishwashers: Rinse filters and run cleaning cycles to prevent buildup.

These small steps help reduce wear and tear while improving efficiency.

DIY vs Professional Repair

Some homeowners may attempt to fix appliances themselves, but not all problems are suited for DIY solutions. While replacing a filter or unclogging a drain can be handled at home, electrical and mechanical issues should be left to experts. Attempting complex repairs without the right knowledge and tools can cause further damage or even pose safety risks. Professional appliance repair ensures accurate diagnosis and long-lasting solutions.

How Appliance Repair Boosts Home Value

Well-maintained appliances add value to your home. Whether you plan to stay long-term or eventually sell, functional appliances are a selling point for buyers. A home with properly working kitchen and laundry appliances demonstrates care and attention, which boosts overall property appeal. Investing in repair services not only benefits your daily comfort but also supports long-term home value.

Choosing Reliable Appliance Repair Services

When it comes to selecting a repair service, experience and reliability matter. Look for professionals with expertise in a wide range of appliances, transparent pricing, and a commitment to quality service. A reliable repair provider should be able to diagnose problems quickly, explain repair options clearly, and offer solutions that suit both your budget and needs.

Appliance repair plays a vital role in maintaining the comfort, efficiency, and functionality of any home. From refrigerators to washing machines, every appliance requires care and occasional servicing to continue operating at its best. By choosing professional repair services, homeowners save money, extend appliance lifespans, and avoid unnecessary stress.

Instead of replacing valuable machines at the first sign of trouble, consider the benefits of repair and preventive maintenance. Not only will you keep your household running smoothly, but you’ll also contribute to a more sustainable lifestyle by reducing waste. With timely attention and expert care, your appliances can continue to serve you well for many years to come.

How to Speed Up the Cabinet Refacing Process

Cabinet Refacing Sacramento

Cabinet Refacing Sacramento is a great way to update your kitchen or bathroom with a fresh new look at a fraction of the cost and hassle of a full remodel. With a variety of door styles, finishes and hardware options, you can customize your look to fit any taste.

Before you start refacing, there are some important things to keep in mind. Read on for tips to help you get the job done faster and more efficiently.

Empty the Cabinets

Cabinet refacing involves covering the flat surfaces of existing cabinet boxes with wood veneer or laminate. It’s a popular choice for homeowners who want to give their kitchen a premium look without the mess and cost of a complete remodel. This process is different from painting or staining because it gives you an entirely new style rather than just a color change.

The first step is to empty out your cabinets and clear away all contents. This gives your refacing team space to work and protects your belongings from dust and other debris. It’s also a good opportunity to clean your cabinets and weed out items you no longer use or need.

After your cabinets are empty, wipe down the surfaces and remove any hardware like hinges and drawer pulls. You can use a mixture of water, soap and vinegar or another mild cleanser to remove any remaining residue. You may also need to touch up any deep dents or scratches with wood putty or auto body filler before you can reface them.

Next, use a utility knife to cut away any caulk or other adhesives holding your cabinets in place. Be sure to label all doors and drawer fronts so you can reinstall them correctly. You might need to replace the hinges and handles when reinstalling them as well.

Professional cabinet refacing teams follow a rigorous preparation process to ensure that the new veneers or laminates bond with the existing substrate and last for years. Skipping or rushing these steps can result in bubbling finishes and separating surfaces, which can be expensive to fix.

Even if the refacing materials match your current kitchen, small measurement errors can create gaps and uneven overlays that ruin the finished look. Detailed measurement guides and experienced teams eliminate these mistakes to ensure that your new cabinet doors and drawer fronts look seamless and integrate seamlessly with the existing cabinet boxes.

Refacing works best on sturdy, structurally sound cabinet boxes. If the box frame is warped, cracked, or damaged, applying new veneers will only mask these problems and may cause the door to hang unevenly or the drawers to misalign. For this reason, it’s important to have your cabinet boxes evaluated by a professional before starting any renovation project.

Prep the Surfaces

Cabinet refacing is a great way to get a fresh new look for your kitchen without the expense and hassle of a complete remodel. The process involves keeping the existing layout and replacing only the doors, drawer fronts and hardware. To give the project a consistent look, a layer of veneer is often applied to the face frames as well. Whether you’re interested in a warm, natural wood texture or a classic, clean paint finish, the type of material you choose can significantly impact project costs.

Before beginning the cabinet refacing process, it’s important to clear out your cabinets and prepare the work area. This step protects your belongings and helps ensure that the job is done correctly. It’s also a great opportunity to clean or weed out items you no longer need or use.

To start, remove all the cabinet and drawer hardware. Then, carefully unscrew and remove the doors and drawers. Store them in a safe place to avoid damage or theft during the project. Next, empty the cabinets and remove any items inside them, such as food or cleaning products. This step can be tedious, but it’s worth it to avoid damage or contamination during the refacing process.

Once the cabinet boxes are empty, make sure there’s a clear path from the entrance to the workspace. It’s also a good idea to cover floors, furniture or appliances with drop cloths to guard against dirt and debris. If you have a dog or cat, consider confining them in another room during the work process.

Before applying the new veneer, it’s important to clean the surface thoroughly. Use a gentle cleanser to remove built-up grime and residue, but be careful not to over-clean. Over-cleaning can cause the veneer to lose its integrity and appearance.

Once you’ve cleaned the surface, it’s time to measure the cabinet openings and determine their dimensions. This will help you order the correct materials for your project.

When you’re ordering your cabinet doors and drawer fronts, it’s a good idea to buy them slightly larger than the measurements you take. This allows for small adjustments and ensures that the new hardware will fit properly.

Clean the Cabinets

Cabinet surfaces are some of the dirtiest and most contaminated areas in any kitchen, especially those positioned above stoves or counters. Grease, oils and other cooking particles rise up through the air and get stuck on the surfaces. Over time, this grime can cause cabinets to feel sticky and look dull. Regular cleaning sessions can keep these surfaces looking like new. However, it’s important to clean the surface of your cabinets properly so the cleaner doesn’t damage the veneer or adhesive. Use a mild cleanser and water to wipe down surfaces. Then, dry everything completely using a microfiber cloth or paper towel to avoid moisture spots that can eventually affect the finish.

Before you start the refacing process, clear out your cabinets and relocate any items that you store in them to another area. This not only gives the refacing team room to work but also protects your belongings from dust and debris during the project. Be sure to remove any removable hardware, like hinges and knobs, and label each piece so it can be returned to the correct place when the refacing is complete.

During the refacing process, it’s also important to clean your countertops and surrounding areas. This will ensure that the refacing team has a clean, even surface to work with. It’s best to use a gentle cleaner that’s safe for wood surfaces, as harsh chemical cleaners may damage them over time. Additionally, it’s important to test any new cleaning solutions in an inconspicuous spot before applying them to the entire countertop.

Once your cabinets are cleaned and dry, they’re ready for the new doors. When purchasing new cabinet doors, consider whether you’d like them to be painted or stained. Some homeowners prefer to go for a custom look and opt for reclaimed or sustainable options that bring a unique look to the space. In addition, it’s important to choose materials that are durable enough for daily use and will withstand seasonal changes.

Depending on the condition of your cabinet boxes, you may be able to save money by refacing them instead of replacing them. If they’re damaged, warped or otherwise unsalvageable, though, replacement might be the better option.

Measure the Cabinets

Cabinet refacing offers homeowners the chance to update their kitchen without the time-consuming, costly disruption of a full remodel. However, even a small-scale cabinet makeover requires accurate measurements and a thorough understanding of best practices to avoid wasting materials. Incorrect cabinet measurements are one of the top reasons DIY projects fail, creating gaps and overlapping edges that ruin both form and function. Professional teams use calibrated tools and proven processes to ensure each piece fits correctly.

Start by measuring the height of each cabinet from floor to ceiling in several spots throughout your kitchen. This will help you account for soffits, uneven walls, and other factors that might affect how well your new cabinets fit. Make sure to also note the location of electrical outlets, pipes, vents, and other obstructions that may need to be moved during installation.

Next, measure the depth of your cabinet boxes to determine if they are deep enough for the new door and drawer fronts you’re planning to install. This will be particularly important if you want to add a more modern or contemporary look to your kitchen by installing taller wall cabinets.

Once you have all the dimensions you need, you’ll be ready to order your cabinet doors and drawer fronts. When they arrive, you’ll need to predrill the hinge cup holes on each door before attaching them to the cabinet box with concealed hinges. You can then test your doors and drawers by swinging them to ensure they open and close properly.

If you’re using wood veneer, you’ll need to lightly sand each piece before applying the adhesive. This will give the glue something to adhere to and minimize the risk of peeling or warping down the line. Laminate and metal cabinetry are more durable, but they still require preparation to ensure the adhesive will hold. Use a high-quality product designed for these surfaces and lightly sand any rough areas to smooth them out before starting.

Once all the pieces are attached, take a step back and examine your work. If any doors rub against each other or against the surrounding walls, you’ll need to reposition the hinges with a screwdriver and level. You’ll also want to check that the new hardware is in place and positioned evenly.